Hiển thị các bài đăng có nhãn Android. Hiển thị tất cả bài đăng

Hướng dẫn lập trình cơ bản với Android phần 22

II. Tạo và sử dụng 1 Content Provider do người dùng tự định nghĩa

Để dễ hiểu hơn các bạn mở Project ContentProviderDemo trong Sourcecode đã down về. Trong Project đó mình tạo 1 Content Provider Books, mỗi bản ghi Book bao gồm 2 trường : ID và Title.

Sau đây là các bước để tạo 1 Content Provider cơ bản ( cụ thể là tạo

ContentProvider Book)

1. Tạo 1 class thừa kế lớp ContentProvider

Mã:

public class BookProvider extends ContentProvider

2. Định nghĩa 1 biến Uri (public static final ) được gọi CONTENT_URI. Các xâu này luôn được bắt đầu bằng “content://” tiếp theo đó là nội dung của mà ContentProvider xử lý. Xâu này phải có đặc tính là duy nhất.

Mã:

public static final String PROVIDER_NAME = "com.vietandroid.provider.Books";

public static final Uri CONTENT_URI = Uri.parse("content://" + PROVIDER_NAME + "/books");

3. Khai báo các xâu để định nghĩa cho từng thuộc tính tương ứng với các cột giá trị từ Cursor.

Mã:

public static final String _ID = "_id";

public static final String TITLE = "title";

lập trình android cơ bản

4. Chúng ta cần tạo hệ thống chứa dữ liệu cho ContentProvider, có thể chưa dưới nhiều hình thức : sử dụng XML, thông qua CSDL SQLite, hay thậm chí là WebService. Trong Demo này chúng ta sử dụng cách phổ biến nhất đó là SQLite:

Mã:

private SQLiteDatabase bookDB;

private static final String DATABASE_NAME = "Books";

private static final String DATABASE_TABLE = "titles";

private static final int DATABASE_VERSION = 1;

tai lieu lap trinh android tieng viet

5. Định nghĩa tên của các cột mà chúng ta sẽ trả lại giá trị cho các clients.Nếu chúng ta đang sử dụng Database ContentProvider hay các lớp SQLiteOpenHelper, tên các cột này chính là id của các cột trong cơ sở dữ liệu SQL. Trong trường hợp này, chúng ta phải gộp cả cột có giá trị là số nguyên được gọi “_id” để định nghĩa id của mỗi bản ghi.

Nếu đang sử dụng cơ sở dữ liệu SQLite, nó sẽ là INTEGER PRIMARY KEY AUTOINCREMENT. Tùy chọn AUTOINCREMENT không bắt buộc, có tác dụng tự động tăng ID của mỗi bản ghi lên nếu người dùng không nhập. Android cung cấp SQLiteOpenHelper giúp tạo và quản lý các phiên bản của cơ sở dữ liệu.

Mã:

private static final String DATABASE_CREATE = "create table " + DATABASE_TABLE +

" (_id integer primary key autoincrement, " + "title text not null);";

private static class DatabaseHelper extends SQLiteOpenHelper

{

public DatabaseHelper(Context context) {

        super(context, DATABASE_NAME , null,DATABASE_VERSION);

}

@Override

public void onCreate(SQLiteDatabase db) {

        db.execSQL(DATABASE_CREATE);

}

@Override

public void onUpgrade(SQLiteDatabase db, int oldVersion, int newVersion) {

        db.execSQL("DROP TABLE IF EXISTS titles");

        onCreate(db);

}

}

6. Nếu chúng ta muốn public các dữ liệu kiểu byte như bitmap thì các trường mà chứa dữ liệu này nên là một xâu với 1 content://URI cho file đó. Đây chính là liên kết để các ứng dụng khác có thể truy cập và sử dụng dữ liệu bitmap này.

7. Sử dụng Cursor để thao tác trên tập dữ liệu : query (), update(), insert(), delete()….. Có thể gọi phương thức ContentResolver.notifyChange() để biếtkhi nào dữ liệu được cập nhật.

Add Book

Mã:

@Override

public Uri insert(Uri uri, ContentValues values) {

long rowID = bookDB.insert(DATABASE_TABLE,"", values);

if(rowID > 0){

         Uri mUri = ContentUris.withAppendedId(CONTENT_URI, rowID);

         getContext().getContentResolver().notifyChange(mUr i, null);

         return mUri;

}

throw new SQLException("Failed to insert new row into " + uri);

}

Get All Books

Mã:

@Override

public Cursor query(Uri uri, String[] projection, String selection, String[] selectionArgs, String sortOrder) {

SQLiteQueryBuilder sqlBuilder = new SQLiteQueryBuilder();

sqlBuilder.setTables(DATABASE_TABLE);

if(uriMatcher.match(uri) == BOOK_ID)

       sqlBuilder.appendWhere(_ID + "=" + uri.getPathSegments().get(1));

if(sortOrder == null || sortOrder == "") sortOrder = TITLE;

Cursor c = sqlBuilder.query(bookDB, projection, selection, selectionArgs, null, null, sortOrder);

c.setNotificationUri(getContext().getContentResolv er(), uri);

return c;

}

}

Mình chỉ demo 2 chức năng là thêm sách và lấy toàn bộ bản ghi trong CSDL , ngoài ra các phương thức edit, sửa , update, xóa... các bạn có thể tự làm .

8. Khai báo Content Provider trong file AndroidManifest.xml

Mã:

<provider android:name = "BookProvider"

android:authorities="com.vietandroid.provider.Books" />

Như vậy chúng ta đã tạo xong ContentProvider Book tự định nghĩa.

Hướng dẫn lập trình cơ bản với Android phần 21- Android Content Provider

Android Content Provider

Trước khi vào bài, các bạn down Sourcecode của bài học tại đây

Sourcecode của bài học bao gồm 3 Project demo :

ContentProviderDemo

ContentProviderDemo1

ContentProviderDemo2

Mỗi Demo sẽ giải quyết từng vấn đề của Tutorial. Các bạn cứ add hết vào workspace để tiện theo dõi.

I. Giới thiệu Content Provider

Content Provider là 1 trong 4 thành phần cơ bản của 1 ứng dụng Android thường có bao gồm:

1. Activity

2. Service

3. Broadcast Receiver

4. Content Provider

Một Content Provider cung cấp một tập chi tiết dữ liệu ứng dụng đến các ứng dụng khác. Thường được sử dụng khi chúng ta muốn tạo cơ sở dữ liệu dưới dạng public (các ứng dụng khác có thể truy xuất ).

Dữ liệu thường được lưu trữ ở file hệ thống, hoặc trong một SQLite database. Đơn giản để các bạn có thể hình dung như : Danh bạ, Call log, cấu hình cài đặt...trên điện thoại là dữ liệu dưới dạng Content Provider.

Content Provider hiện thực một tập phương thức chuẩn mà các ứng dụng khác có thể truy xuất và lưu trữ dữ liệu của loại nó điều khiển.

Tuy nhiên, những ứng dụng không thể gọi các phương thức trực tiếp. Hơn thế chúng dùng lớp Content Resolver và gọi những phương thức đó. Một Content Resolver có thể giao tiếp đến nhiều content provider; nó cộng tác với các provider để quản lý bất kỳ giao tiếp bên trong liên quan.

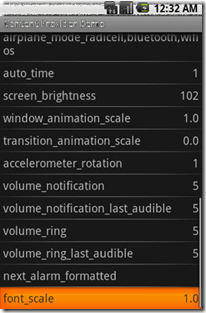
Đơn giản hơn, chúng ta có thể làm 1 ứng dụng nhỏ để lấy tất cả các thông tin cấu hình trong máy load lên listview. Các bạn có thể chạy Project

ContentProviderDemo1 trong SourcecodeDemo.

Android Content Provider  Android Content Provider

Chúng ta có thể tìm hiểu sơ qua về code của demo này, rất ngắn gọn

Mã:

ContentResolver cr = getContentResolver();

Cursor cursor = cr.query(Settings.System.CONTENT_URI, null, null, null, null);

startManagingCursor(cursor);

ListView listView = (ListView) findViewById(R.id.listView);

String[] from = { Settings.System.NAME, Settings.System.VALUE };

int[] to = { R.id.textName, R.id.textValue };

SimpleCursorAdapter adapter = new SimpleCursorAdapter(this, R.layout.row, cursor, from, to);

listView.setAdapter(adapter);

Như các bạn thấy, chỉ cần 2 dòng code đơn giản để lấy được con trỏ thao tác trên tập dữ liệu cần lấy:

Mã:

ContentResolver cr = getContentResolver();

Cursor cursor = cr.query(Settings.System.CONTENT_URI, null, null, null, null);

Lớp Content Resolver cung cấp các phương thức xử lý dữ liệu thông qua các Uri, mỗi Content Provider có 1 Uri cụ thể , ở đây Uri Settings.System.CONTENT_URI sẽ trả lại tập dữ liệu là thông tin cấu hình của thiết bị.

Sau khi lấy được con trỏ tới tập dữ liệu, việc còn lại đơn giản là bind data lên listview để hiển thị:

Mã:

startManagingCursor(cursor); ListView listView = (ListView) findViewById(R.id.listView);

String[] from = { Settings.System.NAME, Settings.System.VALUE };

int[] to = { R.id.textName, R.id.textValue };

SimpleCursorAdapter adapter = new

SimpleCursorAdapter(this, R.layout.row, cursor, from, to);

listView.setAdapter(adapter);

Hướng dẫn lập trình cơ bản với Android phần 20 - Android SQLite Database

Hướng dn lập trình cơ bản vi Android - Bài 6

Bài 6 : Android SQLite Database

Trong bài hôm nay mình sẽ giới thiệu với các bạn cơ sở dữ liệu trên Android - SQLiteDatabase.

1. Giới thiệu SQLite Database

Mỗi ứng dụng đều sử dụng dữ liệu, dữ liệu có thể đơn giản hay đôi khi là cả 1 cấu trúc. Trong Android thì hệ cơ sở dữ liệu được sử dụng là SQLite Database, đây là hệ thống mã nguồn mở được sử dụng rộng rãi trong các ứng dụng ( Mozilla

Firefox sử dụng SQLite để lưu trữ các dữ liệu về cấu hình, iPhone cũng sử dụng cơ sở dữ liệu là SQLite).

Trong Android , cơ sở dữ liệu mà bạn tạo cho 1 ứng dụng thì chỉ ứng dụng đó có quyền truy cập và sử dụng, các ứng dụng khác thì không. Khi đã được tạo, cơ sở dữ liệu SQLite được chứa trong thư mục /data/data/<package_name>/databases .

Tiếp theo mình sẽ giới thiệu với các bạn cách tạo và sử dụng cơ sở dữ liệu SQLite . Cách tốt nhất để hiểu lý thuyết là thực hành, các bạn có thể tạo ngay 1 project trong workspace đặt tên là : SQLiteDemo. Ứng dụng này đơn giản chỉ tạo 1 cơ sở dữ liệu USER bao gồm 2 trường ( id , name ) , ngoài ra có các thao tác thêm , đọc , sửa , xóa.

Các bước thực hiện với CSDL:

1. Tạo 1 CSDL ( thông thường chỉ cần làm 1 lần )

2. Mở CSDL đó

3. Thêm giá trị vào trong table

4. Truy vấn.

5. Đóng CSDL

1. Tạo cơ sở dữ liệu.

Đầu tiên các bạn add 1 class DBAdapter để xử lý tất cả các thao tác liên quan đến

CSDL.

Mã:

public static final String KEY_ID = "_id";

public static final String KEY_NAME = "name";

private DatabaseHelper mDbHelper;

private SQLiteDatabase mDB;

private static final String DATABASE_CREATE = "create table users (_id integer primary key autoincrement, "+ "name text not null);";

private static final String DATABASE_NAME = "Database_Demo";

private static final String DATABASE_TABLE = "users";

private static final int DATABASE_VERSION = 2;

private final Context mContext;

Tạo 1 lớp bên trong DBAdapter được extend từ lớp SQLiteOpenHelper, override 2 phương thức onCreate() và onUpgrade() để quản lý việc tạo CSDL và version của CSDL đó.

Mã:

private static class DatabaseHelper extends SQLiteOpenHelper{

public DatabaseHelper(Context context, String name, CursorFactory factory, int version) {

super(context, name, factory, version); // TODO Auto-generated constructor stub

}

@Override

public void onCreate(SQLiteDatabase db) {

// TODO Auto-generated method stub

db.execSQL(DATABASE_CREATE);

}

@Override

public void onUpgrade(SQLiteDatabase db, int oldVersion, int newVersion) {

// TODO Auto-generated method stub

Log.i(TAG, "Upgrading DB");

db.execSQL("DROP TABLE IF EXISTS users");

onCreate(db);

}

}

2. Mở CSDL :

Mã:

public DBAdapter open(){

mDbHelper = new DatabaseHelper(mContext, DATABASE_NAME, null, DATABASE_VERSION);

mDB = mDbHelper.getWritableDatabase(); return this;

}

3. Thêm giá trị vào CSDL

Mã:

public long createUser(String name){

ContentValues inititalValues = new ContentValues();

inititalValues.put(KEY_NAME, name); return mDB.insert(DATABASE_TABLE, null, inititalValues);

}

4. Truy vấn

Bạn có thể get toàn bộ data hoặc có thể get data theo ID ( tiện cho việc chỉnh sửa hay cập nhật thông tin của từng bản ghi).

Mã:

public Cursor getAllUsers(){

return mDB.query(DATABASE_TABLE, new String[] {KEY_ID, KEY_NAME}, null, null, null, null, null);

}

Còn rất nhiều các thao tác như sửa, xóa, update.... bản ghi, các bạn có thể tự phát triển.

Tất cả các chức năng đó đều được cung cấp bởi lớp SQLiteDatabase, các bạn chỉ cần cụ thể hóa bằng các câu truy vấn là được.

5. Đóng CSDL

Mã:

public void close(){

mDbHelper.close();

}

6. Sử dụng CSDL

Để test CSDL mà bạn vừa tạo, các bạn có thể thêm 1 vài dòng code để thêm 1 user và hiển thị CSDL lên màn hình thông qua lớp Activity ban đầu:

Ở đây mình create 1 user thông qua câu lệnh mDB.createUser("Username"); sau đó

Mã:

public void onCreate(Bundle savedInstanceState) {

super.onCreate(savedInstanceState);

setContentView(R.layout.main);

mDB = new DBAdapter(this); mDB.open();

mDB.createUser("Do Minh Thong");

getData();

}

private void getData(){

mCursor = mDB.getAllUsers();

startManagingCursor(mCursor);

String[] from = new String[]{DBAdapter.KEY_NAME};

int[] to = new int[] {R.id.text1};

SimpleCursorAdapter users = new SimpleCursorAdapter(this, R.layout.users_row, mCursor, from, to);

setListAdapter(users);

}

Kết quả :

lap trinh co so du lieu android

Sourcecode đầy đủ : http://www.mediafire.com/?yzw2d1ijymo

Bài này là bài cơ sở để mình viết tiếp Phần 7 : ContentProvider , các bạn chú ý theo dõi nhé

Hướng dẫn lập trình cơ bản với Android phần 19

Đầu tiên là tạo 1 giao diện điều khiển service chơi nhạc bằng layout đơn giản :

Mã:

<LinearLayout xmlns:android="http://schemas.android.com/apk/res/android" android:orientation="vertical" android:padding="4dip" android:gravity="center_horizontal" android:layout_width="fill_parent" android:layout_height="fill_parent">

<TextView android:layout_width="fill_parent" android:layout_height="wrap_content" android:layout_weight="0" android:paddingBottom="4dip" android:text="@string/local_service_binding"/>

<Button android:id="@+id/bind" android:layout_width="wrap_content"

android:layout_height="wrap_content" android:text="@string/bind_service">

<requestFocus />

</Button>

<Button android:id="@+id/unbind" android:layout_width="wrap_content"

android:layout_height="wrap_content" android:text="@string/unbind_service">

</Button>

<Button android:id="@+id/play" android:layout_width="wrap_content"

android:layout_height="wrap_content" android:text="@string/Play">

</Button>

</LinearLayout>

Tạo 1 class LocalService.java extend từ Service và một lớp con LocalBinder thừa kế từ lớp Binder ( dùng để điều khiển service )

Mã:

public class LocalService extends Service {

public class LocalBinder extends Binder {

LocalService getService() {

       return LocalService.this;

}

}

}

Từ đó nạp chồng phương thức onBind bằng cách trả lại giá trị mBinder

Mã:

private final IBinder mBinder = new LocalBinder();

@Override

public IBinder onBind(Intent intent) {

return mBinder;

}

Tạo một đối tượng MediaPlayer chơi nhạc đơn giản ( sử dụng để chơi file abc.mp3 đặt trong folder res/raw ):

Mã:

MediaPlayer mMediaPlayer;

public void startMp3Player() {

mMediaPlayer =MediaPlayer.create(getApplicationContext(),

R.raw.abc); mMediaPlayer.start();

}

public void mp3Stop() {

mMediaPlayer.stop();

mMediaPlayer.release();

}

Ở lớp LocalServiceBinding.java extend từ lớp Activity chúng ta chỉ cần để ý đến đối tượng mConnection có nhiệm vụ giám sát kết nối của service chơi nhạc.

Mã:

private ServiceConnection mConnection = new ServiceConnection() {

public void onServiceConnected(ComponentName className, IBinder service) {

mBoundService = ((LocalService.LocalBinder)service).getService();

Toast.makeText(LocalServiceBinding.this, R.string.local_service_connected,

Toast.LENGTH_SHORT).show();

}

public void onServiceDisconnected(ComponentName className) {

mBoundService = null;

Toast.makeText(LocalServiceBinding.this,

R.string.local_service_disconnected, Toast.LENGTH_SHORT).show();

}};

Và xử lý sự kiện 3 button ( Bind, Unbin, Play/Stop )

Mã:

private OnClickListener mBindListener = new OnClickListener() {

public void onClick(View v) {

bindService(new Intent(LocalServiceBinding.this, LocalService.class), mConnection, Context.BIND_AUTO_CREATE); mIsBound = true; mPlayButton.setEnabled(true);

}};

private OnClickListener mPlayListener = new OnClickListener() {

public void onClick(View v) {

if(mPlayButton.getText() == "Play"){

            mBoundService.startMp3Player(); mPlayButton.setText("Stop");

}

else{

       mBoundService.mp3Stop(); mPlayButton.setText("Play");

}

}};

private OnClickListener mUnbindListener = new OnClickListener() {

public void onClick(View v) {

      if (mIsBound) {

             unbindService(mConnection); mIsBound = false;

             mPlayButton.setEnabled(false);

     }

}};

Hướng dẫn lập trình cơ bản với Android phần 18

Android Service

4 Tutorial trước các bạn đã có 1 lượng kiến thức kha khá, tiếp sau đây mình xin giới thiệu 1 khái niệm cơ bản nữa trong android, đó là Service

Service là 1 trong 4 thành phần chính trong 1 ứng dụng Android ( Activity, Service, BroadcastReceiver, ContentProvider) thành phần này chạy trong hậu trường và làm những công việc không cần tới giao diện như chơi nhạc, download, xử lí tính toán…

Một Service có thể được sử dụng theo 2 cách:

- Nó có thể được bắt đầu và được cho phép hoạt động cho đến khi một người nào đó dừng nó lại hoặc nó tự ngắt. Ở chế độ này, nó được bắt đầu bằng cách gọi Context.startService() và dừng bằng lệnh Context.stopService(). Nó có thể tự ngắt bằng lệnh Service.stopSelf() hoặc Service.stopSelfResult(). Chỉ cần một lệnh stopService() để ngừng Service lại cho dù lệnh startService() được gọi ra bao nhiêu lần

- Service có thể được vận hành theo như đã được lập trình việc sử dụng một Interface mà nó định nghĩa. Các người dùng thiết lập một đường truyền tới đối tượng Service và sử dụng đường kết nói đó để thâm nhập vào Service. Kết nối này được thiết lập bằng cách gọi lệnh Context.bindService() và được đóng lại bằng cách gọi lệnh Context.unbindService(). Nhiều người dùng có thể kết nối tới cùng một thiết bị. Nếu Service vẫn chưa được khởi chạy, lệnh bindService() có thể tùy ý khởi chạy nó. Hai chế độ này thì không tách biệt toàn bộ. Bạn có thể kết nối với một Service mà nó đã được bắt đầu với lệnh startService(). Ví dụ, một Service nghe nhạc ở chế độ nền có thể được bắt đầu bằng cách gọi lệnh startService() cùng

với một đối tượng Intent mà định dạng được âm nhạc để chơi. Chỉ sau đó, có thể là khi người sử dụng muốn kiểm soát trình chơi nhạc hoặc biết thêm thông tin về bài hát hiện tại đang chơi, thì sẽ có một Activity tạo lập một đường truyền tới Service bằng cách gọi bindService(). Trong trường hợp như thế này, stopService() sẽ không thực sự ngừng Service cho đến khi liên kết cuối cùng được đóng lại.

Giống như một Activity, một Service cũng có các phương thức chu kỳ thời gian mà bạn có thể cài đặt để kiểm soát những sự thay đổi trong trạng thái của nó. Những những phương thức của Service thì ít hơn là của Activity – chỉ có 3- và chúng thì được sử dụng rộng rãi, không được bảo vệ.

void onCreate()

void onStart(Intent intent) void onDestroy()

Bằng việc thực hiện những phương thức này, bạn có thể giám sát 2 vòng lặp của chu kỳ thời gian của mỗi Service

Entire lifetime của một Service diễn ra giữa thời gian onCreate() được gọi ra và thời gian mà onDestroy() trả lại. Giống như một Activity, một Service lại tiết hành cài đặt ban đầu ở onCreate(), và giải phóng tát cả các tài nguyên còn lại ở onDestroy() Ví dụ, một Service phát lại nhạc có thể tạo ra một luồng và bắt đầu chơi nhạc onCreate(),và sau đó luồng chơi nhạc sẽ dừng lại ở onCreate(),

Active lifetime của một Service bắt đầu bằng một lệnh tới onStart(). Đâylà phương thức được chuyển giao đối tượng Intent mà đã được thông qua để tới startService() Service âm nhạc sẽ mở đối tượng Intent để quyết định xem sẽ chơi loại nhạc nào và bắt đầu phát nhạc.

Không có callback tương đương nào cho thời điểm Service ngừng lại – không có phương thức onStop()

Các phương thức onCreate() và onDestroy() được gọi cho tất cả các Service dù chúng có được bắt đầu bằng Context.startService() hoặc Context.bindService() hay không. Tuy nhiên thì, onStart() chỉ được gọi ra đối với các Service bắt đầu bằng startService().

Nếu một Service cho phép những Service khác kết nối với nó thì sẽ có thêm các phương thức callback dành cho Service đó để thực hiên

IBinder onBind(Intent intent) boolean onUnbind(Intent intent) void onRebind(Intent intent)

Hàm callback onBind() thông qua đối tượng Intent đã đựoc truyền đến bindService và onUnbind() được chuyển giao đối tượng mà đã được chuyển đến. Nếu Service

đang được chỉ định (binding), onBind() quay trở lại kênh thông tin mà người dùng sử dụng để tương tác với Service. Phương thức onUnbind() có thể yêu cầu onRebind() được gọi nếu một người dùng kết nối với Service

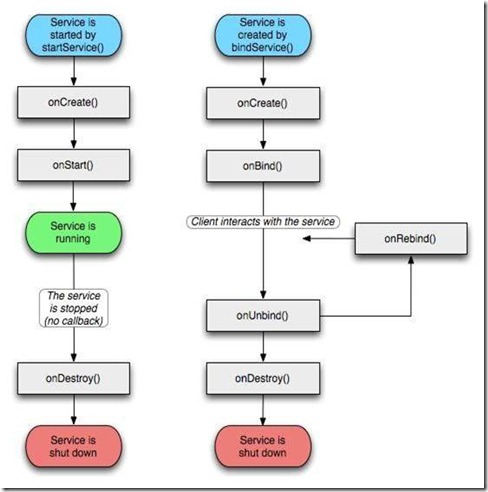
Biểu đồ dưới đây minh họa cho các phương thức callback giành cho một Service. Mặc dù, nó phân tách các Service được tạo ra thông qua startService với các Service mà được tạo ra bằng bindService(). Hãy nhớ rằng bất kì Service nào, cho dù nó được khởi tạo như thế nào thì nó vẫn có thể cho phép các người dùng kết nối tới nó một cách hiệu quả nhất, cho nên bất kì Service nào cũng có thể được chỉ định thông qua các các phương thức onBind()và onUnbind()

lap trinh android co ban

Service LifeCycle

Các bạn đã đọc và hiểu về Service trong Part 1. Tiếp theo mình sẽ làm 1 demo nhỏ để các bạn hiểu rõ hơn về Service. Demo tạo 1 service chơi nhạc và người sử dụng có thể điều khiển service này.

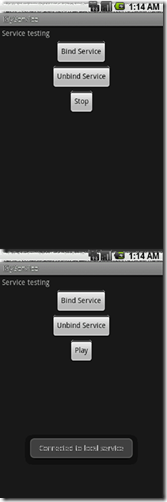
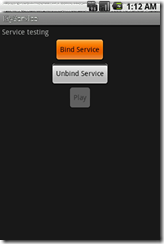
Giao diện chương trình :

lap trinh android co ban   lap trinh android co ban

Hướng dẫn lập trình cơ bản với Android phần 17

B4: Code code code... So tired... Tutorial is really take time. Chỉnh Example.java:
Mã:

package at.exam;
import android.app.Activity;
import android.os.Bundle;
import android.view.Menu;
import android.view.MenuItem;
import android.view.View;
import android.view.View.OnClickListener;
import android.widget.Button;
import android.widget.TextView;
public class Example extends Activity {
Button button1, button2, button3; Button button4, button5, button6; Button button7, button8, button9; Button button0, buttonStar, buttonClear;
TextView numberView;
/** Called when the activity is first created. */
@Override
public void onCreate(Bundle savedInstanceState) {
         super.onCreate(savedInstanceState); setContentView(R.layout.main);
         numberView = (TextView) findViewById(R.id.number_display);
         button1 = (Button) findViewById(R.id.button1);
         button2 = (Button) findViewById(R.id.button2);
         button3 = (Button) findViewById(R.id.button3);

         button4 = (Button) findViewById(R.id.button4);
         button5 = (Button) findViewById(R.id.button5);
         button6 = (Button) findViewById(R.id.button6);

         button7 = (Button) findViewById(R.id.button7);
         button8 = (Button) findViewById(R.id.button8);
         button9 = (Button) findViewById(R.id.button9);
         button0 = (Button) findViewById(R.id.button0);
         buttonStar = (Button)findViewById(R.id.button_star);
         buttonClear = (Button) findViewById(R.id.button_clear);
         button1.setOnClickListener(this.appendString("1"));
         button2.setOnClickListener(this.appendString("2"));
         button3.setOnClickListener(this.appendString("3"));
         button4.setOnClickListener(this.appendString("4"));
         button5.setOnClickListener(this.appendString("5"));
         button6.setOnClickListener(this.appendString("6"));
         button7.setOnClickListener(this.appendString("7"));
         button8.setOnClickListener(this.appendString("8"));
         button9.setOnClickListener(this.appendString("9"));
         button0.setOnClickListener(this.appendString("0"));
         buttonStar.setOnClickListener(this.appendString("*"));
         buttonClear = (Button) findViewById(R.id.button_clear);


         buttonClear.setOnClickListener(new OnClickListener() {
         public void onClick(View v) {
                   numberView.setText("");
         }});
}
public OnClickListener appendString(final String number) {
        return new OnClickListener() {
               public void onClick(View arg0) {
                        numberView.append(number);
               }};
}
public boolean onCreateOptionsMenu(Menu menu) {
         super.onCreateOptionsMenu(menu);
         menu.add(0, Menu.FIRST, 0,"Exit" ).setIcon(android.R.drawable.ic_delete);
         return true;
}
public boolean onOptionsItemSelected(MenuItem item){
         switch (item.getItemId()) {
                   case Menu.FIRST: {
                           finish();
                          break;
                   }
        }
        return false;
}
}

Code quá đơn giản, mình còn ko thèm comment nữa. Lưu ý có 1 Option Menu để đóng Activity và cũng là đóng luôn ứng dụng.
B5: Time to test... Khởi chạy project, rồi sử dụng Option Menu của mình (bấm nút
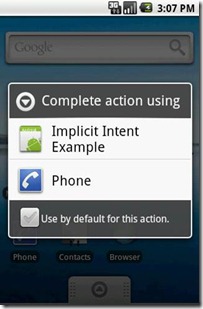
Menu của Emulator hoặc di động Android) để thoát khỏi chương trình. Ok, sau khi chọn Exit ta có thể chắc chắn là ứng dụng đã được đóng hoàn toàn, activity ko còn tồn tại trong stack của Emulator/di động nữa. Giờ nhấn nút Call của Emulator/di động
lap trinh android  lap trinh android

Hướng dẫn lập trình cơ bản với Android phần 16

Đã xong sử dụng Explicit, giờ đến lượt Implicit Intent. Trước khi đi vào ví dụ, hãy dạo qua 1 chút kiến thức về Intent Filter và vai trò của nó.

Intent Filter là gì

Activity, Service và BroadCast Receiver sử dụng Intent Filter để thông báo cho hệ thống biết các dạng Implicit Intent mà nó có thể xử lý. Nói cách khác, Intent Filter là bộ lọc Intent, chỉ cho những Intent được phép đi qua nó.

Intent Filter mô tả khả năng của component định nghĩa nó. Khi hệ thống bắt được 1 Implicit Intent (chỉ chứa 1 số thông tin chung chung về action, data và category...), nó sẽ sử dụng những thông tin trong Intent này, kiểm tra đối chiếu với Intent Filter của các component các ứng dụng, sau đó quyết định khởi chạy ứng dụng nào thích hợp nhất để xử lý Intent bắt được. Nếu có 2 hay nhiều hơn ứng dụng thích hợp, người dùng sẽ được lựa chọn ứng dụng mình muốn.

VD:

Mã:

<activity android:name=".ExampleActivity" android:label="@string/activity_name">

<intent-filter>

<action android:name="android.intent.action.SENDTO" />

<category android:name="android.intent.category.DEFAULT" />

<data android:scheme="sms" />

</intent-filter>

</activity>

Trên là 1 Activity với bộ lọc Intent cho phép bắt và xử lý các Intent gửi SMS. Hãy lưu ý từ khóa

Mã:

andoid:scheme

Từ khóa này cho biết protocol (luật) để xử lý dữ liệu trong URI. Nói 1 cách đơn

giản thì nó là kiểu của dữ liệu. 1 số kiểu khác như http, https, fpt, content...

Using Implicit Intent:

Yêu cầu: Xây dựng chương trình nhập số và gọi. Lưu ý chương trình của mình ở đây chỉ xây dựng đến mức khi nhấn nút Call của di động thì sẽ chạy ứng dụng và hiển thị giao diện cho phép nhập số. Phần gọi dành cho ai yêu thích tìm hiểu thêm ^_^ Phần này không hề khó nhưng ở đây mình chỉ muốn minh họa Implicit Intent nên sẽ không đưa vào.

B1: Khởi tạo project: File -> New -> Android Project Project name: Implicit Intent Example

Build Target: Chọn Android 1.5

Application name: Implicit Intent Example Package name: at.exam

Create Activity: Example

=> Kích nút Finish.

B2: Đây là bước quan trọng nhất và cũng là bước có ý nghĩa duy nhất trong cả project này, các bước còn lại chỉ là bước râu ria mà mình thêm vào cho cái project nó ra hồn 1 chút. Bước này sẽ thêm 1 bộ lọc Intent Filter vào cho activity Example của chúng ta để bắt sự kiện nhấn nút Call của di động

-> Vào AndroidManifest.xml chỉnh sửa như sau:

Mã:

<?xml version="1.0" encoding="utf-8"?>

<manifest xmlns:android="http://schemas.android.com/apk/res/andro id"

package="at.exam" android:versionCode="1" android:versionName="1.0">

<application android:icon="@drawable/icon" android:label="@string/app_name">

<activity android:name=".Example" android:label="@string/app_name">

<intent-filter>

<action android:name="android.intent.action.MAIN" />

<category android:name="android.intent.category.LAUNCHER" />

</intent-filter>

<intent-filter>

<action android:name="android.intent.action.CALL_BUTTON" />

<category android:name="android.intent.category.DEFAULT" />

</intent-filter>

</activity>

</application>

<uses-sdk android:minSdkVersion="3" />

</manifest>

Thực chất chỉ là bổ sung thêm dòng chữ đỏ mình đánh dấu thôi ^_^

B3: Xây dựng giao diện trong main.xml, bước này ko quan trọng, chỉ là râu ria cho activity có cái giao diện:

Mã:

<?xml version="1.0" encoding="utf-8"?>

<LinearLayout xmlns:android="http://schemas.android.com/apk/res/android"

android:layout_width="fill_parent" android:layout_height="fill_parent"

android:orientation="vertical">

<TextView android:paddingTop="10px" android:id="@+id/number_display" android:layout_width="fill_parent" android:layout_height="wrap_content" android:textSize="30px" android:gravity="center" android:lines="2" android:background="#ffffff" android:textColor="#000000"/>

<TableLayout xmlns:android="http://schemas.android.com/apk/res/android"

android:layout_width="fill_parent" android:layout_height="fill_parent">

<TableRow android:gravity="center" android:paddingTop="30px">

<Button android:id="@+id/button1" android:layout_width="80px"

android:layout_height="80px" android:gravity="center" android:text="1" android:textSize="25px"/> <Button android:id="@+id/button2" android:layout_width="80px" android:layout_height="80px" android:gravity="center" android:text="2" android:textSize="25px"/>

<Button android:id="@+id/button3" android:layout_width="80px" android:layout_height="80px" android:gravity="center" android:text="3" android:textSize="25px"/>

</TableRow>

<TableRow android:gravity="center">

<Button android:id="@+id/button4" android:layout_width="80px" android:layout_height="80px" android:gravity="center" android:text="4" android:textSize="25px"/>

<Button android:id="@+id/button5" android:layout_width="80px" android:layout_height="80px" android:gravity="center" android:text="5" android:textSize="25px"/>

<Button android:id="@+id/button6" android:layout_width="80px" android:layout_height="80px" android:gravity="center" android:text="6" android:textSize="25px"/>

</TableRow>

<TableRow android:gravity="center">

<Button android:id="@+id/button7" android:layout_width="80px" android:layout_height="80px" android:gravity="center" android:text="7" android:textSize="25px" />

<Button android:id="@+id/button8" android:layout_width="80px"

android:layout_height="80px" android:gravity="center" android:text="8" android:textSize="25px" />

<Button android:id="@+id/button9" android:layout_width="80px" android:layout_height="80px" android:gravity="center" android:text="9" android:textSize="25px"/>

</TableRow>

<TableRow android:layout_width="fill_parent" android:layout_height="wrap_content" android:gravity="center">

<Button android:id="@+id/button_star" android:layout_width="80px" android:layout_height="80px" android:gravity="center" android:text="*" android:textSize="25px" />

<Button android:id="@+id/button0" android:layout_width="80px" android:layout_height="80px" android:gravity="center" android:text="0" android:textSize="25px"/>

<Button android:id="@+id/button_clear" android:layout_width="80px" android:layout_height="80px" android:gravity="center" android:text="Clear" android:textSize="25px"/>

</TableRow>

</TableLayout>

</LinearLayout>

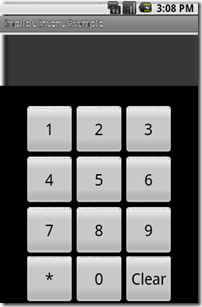
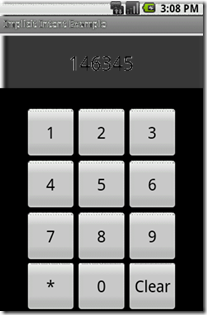
LinearLayout chứa 1 TextView để hiển thị số nhấn, 1 TableLayout có các Button tương ứng với các số và 1 Button để clear cho TextView.

Hướng dẫn lập trình cơ bản với Android phần 15

B6: Tạo BroadCast Receiver để nhận Intent mà Activity2 gửi tới -> Tạo 1 file Receiver.java trong at.exam -> Nội dung:

Mã:

package at.exam;

import android.content.BroadcastReceiver;

import android.content.Context;

import android.content.Intent;

import android.widget.Toast;

public class Receiver extends BroadcastReceiver{

@Override

public void onReceive(Context context, Intent intent) {

long value = intent.getLongExtra("new value", -10) + 10;

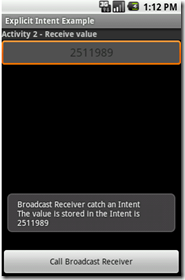
Toast toast = Toast.makeText(context, "Broadcast Receiver catch an Intent"+ " \n" + "The value is stored inthe Intent is "+ String.valueOf(value), Toast.LENGTH_LONG); toast.show();

}

}

Code không hề khó hiểu, và mình cũng đã add comment. Chỉ cần lưu ý ở đây là Toast là lớp để hiển thị một thông báo đơn giản trong 1 khoảng thời gian cố định, và ko thể thay đổi thời gian này T_T (why???) chỉ có thể chọn giữa LENGTH_SHORT với LENGTH_LONG

B7: Bổ sung thêm thông tin về component mới vào AndroidManifest.xml:

Mã:

<?xml version="1.0" encoding="utf-8"?>

<manifest xmlns:android="http://schemas.android.com/apk/res/andro id"

package="at.exam" android:versionCode="1" android:versionName="1.0">

<application android:icon="@drawable/icon" android:label="@string/app_name">

<activity android:name=".Activity1" android:label="@string/app_name">

<intent-filter>

<action android:name="android.intent.action.MAIN" />

<category android:name="android.intent.category.LAUNCHER" />

</intent-filter>

</activity>

<activity android:name=".Activity2"></activity>

<receiver android:name=".Receiver"></receiver>

</application>

<uses-sdk android:minSdkVersion="3" />

</manifest>

tai lieu lap trinh android tai lieu lap trinh androidtai lieu lap trinh android

Hướng dẫn lập trình cơ bản với Android phần 14

B3: Tạo giao diện cho Activity2 -> Chuột phải vào folder res\layout -> New -> Android XML File ->Gõ tên là activity2_layout.xml

Mã:

<?xml version="1.0" encoding="utf-8"?>

<LinearLayout xmlns:android="http://schemas.android.com/apk/res/andro id"

android:orientation="vertical" android:layout_width="fill_parent" android:layout_height="fill_parent">

<TextView android:layout_width="fill_parent" android:layout_height="wrap_content"

android:text="Activity 2 - Receive value" android:typeface="normal" android:textSize="14px" android:textStyle="bold" android:textColor="#cccccc" android:background="#333333"/>

<EditText android:id="@+id/value_receive" android:layout_width="fill_parent" android:layout_height="wrap_content" android:textSize="20px" android:gravity="center" android:lines="1" android:numeric="integer" android:enabled="false"/>

<RelativeLayout android:layout_width="fill_parent" android:layout_height="fill_parent">

          <Button android:id="@+id/call_button" android:layout_width="fill_parent" android:layout_height="wrap_content" android:text="Call Broadcast Receiver" android:layout_alignParentBottom="true" />

</RelativeLayout>

</LinearLayout>

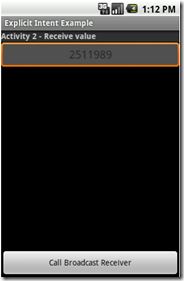
Layout của Activity2 tương tự như Activity1, nhưng Button bây giờ là để gọi BroadCast Receiver. Ngoài ra mình dùng EditText để hiển thị value nhận được (do nó có cái đường bao ngoài đẹp hơn TextView ^_^) nên không cho phép nhập giá trị vào EditText này

Mã:

android:enabled="false"

B4:Sửa lại nội dung của Activity1.java như sau:

Mã:

package at.exam;

import android.app.Activity;

import android.content.Intent;

import android.os.Bundle;

import android.view.View;

import android.view.View.OnClickListener;

import android.widget.Button;

import android.widget.EditText;

public class Activity1 extends Activity {

/** Called when the activity is first created. */

@Override

public void onCreate(Bundle savedInstanceState) {

super.onCreate(savedInstanceState);

setContentView(R.layout.activity1_layout);

final EditText editValue = (EditText) findViewById(R.id.value_edit);

final Button sendButton = (Button) findViewById(R.id.send_button);

sendButton.setOnClickListener(new OnClickListener() {

public void onClick(View v) {

          String valueString =editValue.getText().toString();

          long value;

          if (valueString != null) {

                   value =Long.parseLong(valueString);

          }

          else  value = 0;

          //Tạo 1 đối tượng Bundle để gửi đi cùng Intent

          Bundle sendBundle = new Bundle(); sendBundle.putLong("value",value);

          //Tạo Intent để khởi chạy Activity2 và gắn sendBundble vào Intent

          Intent i = new Intent(Activity1.this, Activity2.class);

          i.putExtras(sendBundle); startActivity(i);

          //Giải phóng Activity1 khỏi Activity Stack vì ta sẽ ko quay lại nó nữa

                    finish();

}});

}

}

B5: Tạo mới 1 Class Activity2.java trong package at.exam -> chỉnh sửa nội dung:

Mã:

package at.exam;

import android.app.Activity;

import android.content.Intent;

import android.os.Bundle;

import android.view.View;

import android.view.View.OnClickListener;

import android.widget.Button;

import android.widget.EditText;

public class Activity2 extends Activity {

/** Called when the activity is first created. */

@Override

public void onCreate(Bundle savedInstanceState) {

super.onCreate(savedInstanceState);

setContentView(R.layout.activity2_layout);

final EditText receiveValueEdit = (EditText) findViewById(R.id.value_receive);

final Button callReceiverButton = (Button) findViewById(R.id.call_button);

//Lấy về Bundle được gửi kèm Intent rồi lấy ra giá trị

Bundle receiveBundle = this.getIntent().getExtras();

final long receiveValue = receiveBundle.getLong("value");

receiveValueEdit.setText(String.valueOf(receiveValue));

callReceiverButton.setOnClickListener(new OnClickListener() {

public void onClick(View v) {

//Khởi tạo 1 Intent để gửi tới BroadCast Receiver

//Gắn giá trị vào Intent, lần này ko cần Bundle nữa

Intent i = new Intent(Activity2.this, Receiver.class);

i.putExtra("new value",receiveValue - 10);

sendBroadcast(i);

}});

}}

Hướng dẫn lập trình cơ bản với Android phần 13

Trong bài này mình sẽ đi sâu nói rõ về Intent, phần cơ bản và đóng vai trò rất quan trọng trong lập trình ứng dụng Android.

Khái niệm vIntent:

Theo định nghĩa của Google, Intent là một miêu tả về một hoạt động cần được thực hiện. Còn nói một cách đơn giản và dễ hiểu hơn, Intent là một cơ cấu cho phép truyền thông điệp giữa các thành phần của 1 ứng dụng và giữa các ứng dụng với nhau.

Các thuộc tính của Intent:

- action: là hành động được thực hiện, vd : ACTION_VIEW, ACTION_MAIN

- data: là dữ liệu sẽ được xử lý trong action, thường được diễn tả là một Uri (Uniform Resource Identifier, tham khảo http://en.wikipedia.org/wiki/Uniform...rce_Identifier để hiểu rõ thêm chi tiết).

VD:

ACTION_VIEW content://contacts/people/1 - Hiển thị thông tin về người với mã danh 1

ACTION_DIAL content://contacts/people/1 - Hiển thị màn hình gọi đến người với mã danh 1

ACTION_DIAL tel:123 - Hiển thị màn hình gọi với số gọi là 123

Ngoài ra còn có 1 số thuộc tính mà ta có thể bổ sung vào Intent: - category: bổ sung thêm thông tin cho action của Intent. VD:

CATEGORY_LAUNCHER thông báo sẽ thêm vào Launcher như là một ứng dụng

top-level

- type: chỉ rõ kiểu của data

- component: chỉ rõ thành phần sẽ nhận và xử lý intent. Khi thuộc tính này được xác định thì các thuộc tính khác sẽ trở thành thuộc tính phụ.

- extras: mang theo đối tượng Bundle chứa các giá trị bổ sung.

VD:

ACTION_MAIN CATEGORY_HOME: trở về màn hình Home của Android (khi bấm nút Home của di động)

Phân loại Intent:

Intent được chia làm 2 loại:

- Explicit Intents: intent đã được xác định thuộc tính component, nghĩa là đã chỉ rõ thành phần sẽ nhận và xử lý intent. Thông thường intent dạng này sẽ không bổ sung thêm các thuộc tính khác như action, data. Explicit Intent thương được sử dụng để khởi chạy các activity trong cùng 1 ứng dụng.

- Implicit Intents: Intent không chỉ rõ component xử lý, thay vào đó nó bổ sung thông tin trong các thuộc tính. Khi intent được gửi đi, hệ thống sẽ dựa vào những thông tin này để quyết định component nào thích hợp nhất để xử lý nó.

VD:

ACTION_DIAL tel:123 thông thường sẽ được hệ thống giao cho activity Phone Dialer mặc định của Android xử lý.

Mt số action thường s dng trong Intent:

ACTION_ANSWER - mở Activity để xử lý cuộc gọi tới, thường là Phone Dialer của Android

ACTION_CALL - mở 1 Phone Dialer (mặc định là PD của Android) và ngay lập tức thực hiện cuộc gọi dựa vào thông tin trong data URI

ACTION_DELETE - mở Activity cho phép xóa dữ liệu mà địa chỉ của nó chứa trong data URI

ACTION_DIAL - mở 1 Phone Dialer (mặc định là PD của Android) và điền thông tin lấy từ địa chỉ chứa trong data URI

ACTION_EDIT - mở 1 Activity cho phép chỉnh sửa dữ liệu mà địa chỉ lấy từ data URI

ACTION_SEND - mở 1 Activity cho phép gửi dữ liệu lấy từ data URI, kiểu của dữ liệu xác định trong thuộc tính type

ACTION_SENDTO - mở 1 Activity cho phép gửi thông điệp tới địa chỉ lấy từ data URI

ACTION_VIEW - action thông dụng nhất, khởi chạy activity thích hợp để hiển thị dữ liệu trong data URI

ACTION_MAIN - sử dụng để khởi chạy 1 Activity

OK, lý thuyết như thế là đã tạm ổn. Giờ chúng ta sẽ chuyển qua phần thực hành để hiểu rõ cách sử dụng Intent. Như đã nêu ở trên, Intent chia làm 2 loại: explicit intent và implicit intent. Mỗi loại Intent sẽ có cách cài đặt và sử dụng khác nhau.

Using Explicit Intents

Yêu cầu: Xây dựng chương trình gồm 2 Activity. Activity1 là Activity chạy ban đầu lúc khởi động ứng dụng, cho phép nhập vào 1 giá trị, cho phép khởi chạy Activity2 và gửi giá trị này tới Activity2. Activity2 sẽ nhận và hiển thị giá trị, rồi lại gửi giá trị này tới 1 BroadcastReceiver. Cơ chế gửi và khởi chạy Activity sử dụng thông qua Intent.

B1: Khởi tạo project: File -> New -> Android Project Project name: Explicit Intent Example

Build Target: Chọn Android 1.5

Application name: Explicit Intent Example Package name: at.exam

Create Activity: Activity1

=> Kích nút Finish.

B2: Tạo giao diện cho Activity1 -> res\layout\main.xml chuyển tên thành activity1_layout.xml

Mã:

<?xml version="1.0" encoding="utf-8"?>

<LinearLayout xmlns:android="http://schemas.android.com/apk/res/andro id"

android:orientation="vertical" android:layout_width="fill_parent" android:layout_height="fill_parent">

<TextView android:layout_width="fill_parent" android:layout_height="wrap_content" android:text="Activity 1 - Send value" android:typeface="normal" android:textSize="14px" android:textStyle="bold" android:textColor="#cccccc" android:background="#333333"/>

<EditText android:id="@+id/value_edit" android:layout_width="fill_parent" android:layout_height="wrap_content" android:textSize="20px" android:gravity="center" android:lines="1" android:numeric="integer"/>

<RelativeLayout android:layout_width="fill_parent" android:layout_height="fill_parent">

     <Button android:id="@+id/send_button" android:layout_width="fill_parent" android:layout_height="wrap_content" android:text="Send to Activity 2" android:layout_alignParentBottom="true"/>

</RelativeLayout>

</LinearLayout>

Layout cho Activity1 bao gồm 1 LinearLayout chứa 1 TextView, 1 EditText để nhập giá trị (đã giới hạn kiểu nhập là number), và 1 RelativeLayout có 1 Button để khởi chạy Activity2. Mình sử dụng RelaytiveLayout để có thể xếp Button này xuống phía cuối của giao diện.

Hướng dẫn lập trình cơ bản với Android phần 12

B9: Việc cuối cùng cần làm là viết lại Activity. Tới Example.java và chỉnh sửa theo nội dung sau:

Mã:

package at.exam;

import java.util.ArrayList;

import android.app.Activity;

import android.app.AlertDialog;

import android.content.DialogInterface;

import android.os.Bundle;

import android.view.Menu;

import android.view.MenuItem;

import android.view.View;

import android.view.View.OnClickListener;

import android.widget.ArrayAdapter;

import android.widget.Button;

import android.widget.EditText;

import android.widget.ListView;

public class Example extends Activity {

//Các hằng dùng cho tạo Option Menu

private static final int DELETE_WORK = Menu.FIRST;

private static final int ABOUT = Menu.FIRST + 2;

ArrayList<Work> array;

ListWorkAdapter arrayAdapter; @Override

public void onCreate(Bundle savedInstanceState) {

super.onCreate(savedInstanceState);

setContentView(R.layout.main);

array = new ArrayList<Work>();

arrayAdapter = new ListWorkAdapter(this,

R.layout.list, array);

final EditText workEnter = (EditText) findViewById(R.id.work_enter);

final EditText hourEdit = (EditText) findViewById(R.id.hour_edit);

final EditText minuteEdit = (EditText) findViewById(R.id.minute_edit);

final Button button = (Button) findViewById(R.id.button);

//Tạo list view cho danh sách công việc final ListView list = (ListView)

findViewById(R.id.list);

list.setAdapter(arrayAdapter);

OnClickListener add = new OnClickListener() {

@Override

public void onClick(View v) {

          if(workEnter.getText().toString().equals("") || hourEdit.getText().toString().equals("") || minuteEdit.getText().toString().equals("")) {

          AlertDialog.Builder builder = new AlertDialog.Builder(Example.this); builder.setTitle("Info missing"); builder.setMessage("Please enter all information of the work");

          builder.setPositiveButton("Continue", new DialogInterface.OnClickListener() {

          public void onClick(DialogInterface dialog, int which) {

                    // TODO Auto-generated method stub

          }});

          builder.show();

}

else {

         String workContent = workEnter.getText().toString();

         String timeContent = hourEdit.getText().toString() + ":"+minuteEdit.getText().toString();

          Work work = new Work(workContent,timeContent);

          array.add(0, work);

          arrayAdapter.notifyDataSetChanged();

          workEnter.setText("");

         hourEdit.setText(""); minuteEdit.setText("");

}}};

button.setOnClickListener(add);

}

//Tạo Option Menu

public boolean onCreateOptionsMenu(Menu menu) {

super.onCreateOptionsMenu(menu);

menu.add(0, DELETE_WORK, 0,"Delete").setIcon(android.R.drawable.ic_delete); menu.add(0, ABOUT, 0,"About").setIcon(android.R.drawable.ic_menu_info_details); return true;

}

//Xử lý sự kiện khi các option trong Option Menu được lựa chọn

public boolean onOptionsItemSelected(MenuItem item){

switch (item.getItemId()) {

case DELETE_WORK: { deleteCheckedWork(); break;

}

case ABOUT: {

AlertDialog.Builder builder = new AlertDialog.Builder(this);

builder.setTitle("VietAndroid"); builder.setMessage("AUTHOR:" + "\n" + " Nguyen Anh Tuan" + "\n" + "SOURCE:" + "\n" + " diendan.vietandroid.com");

builder.setPositiveButton("Close", new DialogInterface.OnClickListener() {

          public void onClick(DialogInterface dialog, int which) {

          }

});

          builder.setIcon(android.R.drawable.ic_dialog_info); builder.show();

         break;

}}

return true;

}

private void deleteCheckedWork() {

if (array.size() > 0) {

for (int i = 0; i < array.size(); i++) {

          if (i > array.size()) {

                break;

                     }

if (array.get(i).isChecked()) {

          array.remove(i);

          arrayAdapter.notifyDataSetChanged();

                    continue;

}

}}}}

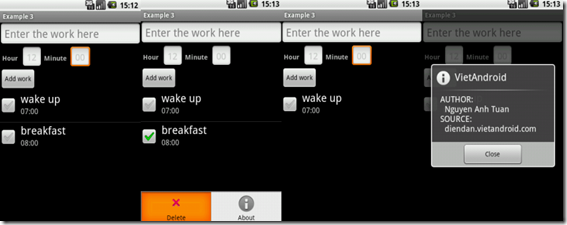
OK. Vậy là xong. Option Menu là menu ẩn chỉ hiện ra khi bạn nhấn nút Menu của điện thoại. Option Menu rất tiện trong việc đưa ra các tùy chỉnh, giống như khi bạn nhấn phím Esc khi đang chơi game trên PC vậy.

Các bạn có thể lưu ý là thay vì sử dụng ArrayList<String> như trước mình đã thay bằng ArrayList<Work> và trong khởi tạo đối tượng arrayAdapter thì đối số thứ 2 là R.layout.list thay vì android.R.layout.simple_list_item_1, nghĩa là chúng ta đã sử dụng layout do mình tự tạo thay vì layout Android cung cấp sẵn cho hiển thị các thành phần của ListView.

Nếu chạy thử, các bạn có thể thấy khi ta đánh dấu vào checkbox của 1 thành phần trong list, rồi nhấn Menu và chọn delete thì thành phần sẽ bị gỡ bỏ khỏi danh sách.

tai lieu lap trinh android

Hướng dẫn lập trình cơ bản với Android phần 11

B5: Chỉnh sửa file strings.xml trong res\value:

Mã:

<?xml version="1.0" encoding="utf-8"?>

<resources>

<string name="app_name">Example 3</string>

<string name="work_hint">Enter the workhere</string>

<string name="hour_edit">Hour</string>

<string name="minute_edit">Minute</string>

<string name="button_content">Add work</string>

</resources>

B6: Time to coding. Đi tới src\at.exam tạo một class mới là CustomViewGroup với nội dung sau:

Mã:

package at.exam;

import android.content.Context;

import android.view.LayoutInflater;

import android.widget.CheckBox;

import android.widget.LinearLayout;

import android.widget.TextView;

public class CustomViewGroup extends LinearLayout {

public CheckBox cb;

public TextView workContent;

public TextView timeContent;

public CustomViewGroup(Context context) {

          super(context);

                    //Sử dụng LayoutInflater để gán giao diện trong list.xml cho class này

                    LayoutInflater li = (LayoutInflater) this.getContext().getSystemService(Context.LAYOUT_INFLATER_SERVICE); li.inflate(R.layout.list, this, true);

                   //Lấy về các View qua Id

         cb = (CheckBox) findViewById(R.id.check_work);

         workContent = (TextView)findViewById(R.id.work_content);

         timeContent = (TextView) findViewById(R.id.time_content);

}

}

Đoạn code trên giúp ta định nghĩa giao diện của custom ViewGroup mới dựa trên file list.xml. Mọi người cũng có thể tạo giao diện bằng code, ko cần sử dụng XML nhưng sẽ phức tạp hơn và mình cũng ko giới thiệu ở đây.

B7: Tạo 1 class Work cũng trong at.exam để thể hiện công việc:

package at.exam;

public class Work {

private String workContent;

private String timeContent;

private boolean isChecked;

public Work(String workContent, String timeContent){

this.workContent = workContent;

this.timeContent = timeContent;

isChecked = false;

}

public String getContent() {

return workContent;

}

public String getTime() {

return timeContent;

}

public void setChecked(boolean isChecked) {

this.isChecked = isChecked;

}

public boolean isChecked() {

return isChecked;

}

}

Code rất đơn giản nên mình sẽ không chú thích nữa.

B8: Chúng ta đã tạo xong custem ViewGroup, bây giờ chính là lúc sử dụng. Tạo 1 class mới tên là ListWorkApdapter trong at.exam:

Mã:

package at.exam;

import java.util.ArrayList;

import android.content.Context;

import android.view.LayoutInflater;

import android.view.View;

import android.view.ViewGroup;

import android.widget.ArrayAdapter;

import android.widget.CheckBox;

import android.widget.CompoundButton;

import android.widget.TextView;

import android.widget.CompoundButton.OnCheckedChangeListener;

public class ListWorkAdapter extends ArrayAdapter<Work>{

ArrayList<Work> array;

int resource;

Context context;

public ListWorkAdapter(Context context, int textViewResourceId,ArrayList<Work> objects) {

          super(context, textViewResourceId, objects); this.context = context;

          resource = textViewResourceId; array = objects;

}

//Phương thức xác định View mà Adapter hiển thị, ở đây chính là CustomViewGroup

//Bắt buộc phải Override khi kế thừa từ ArrayAdapter

@Override

public View getView(int position, View convertView, ViewGroup parent) {

View workView = convertView;

if (workView == null) { workView = new

CustomViewGroup(getContext());

}

//Lấy về đối tượng Work hiện tại

final Work work = array.get(position);

if (work != null) {

TextView workContent = ((CustomViewGroup) workView).workContent;

TextView timeContent = ((CustomViewGroup) workView).timeContent;

CheckBox checkWork = ((CustomViewGroup) workView).cb;

//Set sự kiện khi đánh dấu vào checkbox trên list

checkWork.setOnCheckedChangeListener(new OnCheckedChangeListener() {

@Override

public void onCheckedChanged(CompoundButton buttonView,boolean isChecked) {

         work.setChecked(isChecked);

}});

//Lấy về nội dung cho TextView và CheckBox dựa vào đối tượng Work hiện tại

workContent.setText(work.getContent()); timeContent.setText(work.getTime()); checkWork.setChecked(work.isChecked());

}

return workView;

}

}

ListWorkAdapter sẽ được sử dụng thay thế cho ArrayAdapter được bind với ListView. Thông thường ArrayAdapter chỉ cho hiển thị String bằng TextView, nhưng với việc kế thừa và override phương thức getView, ta có thể định nghĩa lại hiển thị cho các thành phần của ListView.

Hướng dẫn lập trình cơ bản với Android phần 10

Trong bài này mình sẽ hướng dẫn cách tạo 1 custom ViewGroup, sử dụng ViewGroup này vào ListView, và cuối cùng là tạo 1 Option Menu. Đây cũng sẽ là bài cuối cùng mình viết về làm việc với View, các bài sau sẽ chuyển qua Intent và BroadCast Receiver.

Custom ViewGroup

ViewGroup thông thường chúng ta hay gặp là LinearLayout, Relative Layout. Xây dựng custom ViewGroup cho phép chúng ta tạo 1 tập các widget được sắp xếp theo ý muốn rồi đưa vào sử dụng.

Yêu cầu: Xây dựng ứng dụng dạng To Do List: Cho phép nhập vào nội dung công việc và thời gian thực hiện công việc rồi đưa vào list công việc. Cho phép xóa các công việc khỏi list.

B1: Khởi tạo project: File-> New -> Android Project Project name: Example 3

Build Target: Chọn Android 1.5

Application name: Example 3 Package name: at.exam Create Activity: Example

=> Kích nút Finish.

B2: Xây dựng custom view group trong XML. Đi tới res\layout tạo 1 file XML mới là list.xml. Gõ nội dung sau vào:

Mã:

<?xml version="1.0" encoding="utf-8"?>

<LinearLayout xmlns:android="http://schemas.android.com/apk/res/andro id"

android:layout_width="wrap_content" android:layout_height="wrap_content" android:orientation="horizontal">

<CheckBox android:id="@+id/check_work" android:layout_width="wrap_content"

android:layout_height="wrap_content" android:text="" android:paddingTop="45px" android:paddingRight="10px"/>

<LinearLayout android:layout_width="wrap_content" android:layout_height="wrap_content" android:orientation="vertical">

<TextView android:id="@+id/work_content" android:textSize="24px" android:layout_width="wrap_content" android:layout_height="wrap_content" android:lines="1"

android:textColor="@color/work_color"/>

<TextView android:id="@+id/time_content" android:textSize="16px" android:layout_width="wrap_content" android:layout_height="wrap_content" android:lines="1" android:textColor="@color/time_color"/>

</LinearLayout>

</LinearLayout>

Custom ViewGroup của chúng ta ở đây khá đơn giản, đó là 1 LinearLayout chứa 2 thành phần: 1 CheckBox và 1 LinearLayout khác gồm 2 TextView để hiển thị nội dung công việc và thời gian.

B3: Đã xong giao diện cho custom ViewGroup, chúng ta sẽ thiết kế giao diện cho chương trình trong main.xml. Ở đây mình dùng lại giao diện của Example 2 trong bài 2.

Mã:

<?xml version="1.0" encoding="utf-8"?>

<LinearLayout xmlns:android="http://schemas.android.com/apk/res/andro id"

android:orientation="vertical" android:layout_width="fill_parent" android:layout_height="fill_parent">

<EditText android:id="@+id/work_enter" android:layout_width="fill_parent"

android:layout_height="wrap_content" android:hint="@string/work_hint" android:lines="1" android:textSize="24px">

<LinearLayout

android:layout_width="wrap_content" android:layout_height="wrap_content" android:orientation="horizontal">

<TextView android:layout_width="50px"

android:layout_height="wrap_content" android:text="@string/hour_edit" android:typeface="normal" android:textSize="15px" android:textStyle="bold" android:padding="5px"/>

<EditText android:id="@+id/hour_edit" android:layout_width="45px" android:layout_height="wrap_content" android:hint="12" android:textColorHint="@color/hint_color" android:textSize="20px" android:gravity="center" android:padding="5px" android:numeric="integer" android:maxLength="2"/> <TextView

android:layout_width="65px" android:layout_height="wrap_content" android:text="@string/minute_edit" android:typeface="normal" android:textSize="15px" android:textStyle="bold" android:padding="5px"/> <EditText

android:id="@+id/minute_edit" android:layout_width="45px" android:layout_height="wrap_content" android:hint="00" android:textColorHint="@color/hint_color" android:textSize="20px" android:gravity="center" android:padding="5px" android:numeric="integer" android:maxLength="2"/>

</LinearLayout>

<Button android:id="@+id/button" android:layout_width="wrap_content" android:layout_height="wrap_content" android:gravity="center" android:text="@string/button_content" />

<ListView android:id="@+id/list" android:layout_width="fill_parent" android:layout_height="wrap_content"/>

</LinearLayout>

B4: Tạo file colors.xml trong res\value:

Mã:

<?xml version="1.0" encoding="utf-8"?>

<resources>

<color name="work_color">#ffffff</color>

<color name="time_color">#cccccc</color>

<color name="hint_color">#cccccc</color>

</resources>

work_color là màu của nội dung công việc trong list. time_color màu của thời gian công việc. hint_color màu của text hint (dòng hướng dẫn) các EditText.